AWS Static Web Hosting - S3, Route53, Cloudfront-SSL & More..
Contents
The video walkthrough.
Steps - We Will Learn With Easy 4 Step:
- Create an S3 Bucket and setup static web hosting
- Create hosted zone in Route53, and update DNS (Domain Name System) records with domain registrar.
- Setup CloudFront, Configure AWS Certificate Manager (ACM) for SSL, and update Route53 record.
- Optional: Setup Lamda for contact api, Save to DynamoDB, and Configure API Gateway

Step 1: S3 Bucket Setup
1. Create an S3 Bucket
- Navigate to S3 and create a new bucket with public access.
- Make sure to uncheck the “block all public access”.

S3 Bucket public access

2. Upload files & Update bucket policy
- Upload your HTML, CSS, and other static files to the S3 bucket.
- In Bucket > Choose Properties > Static website hosting > Enable
- In Bucket > Permissions > Bucket Policy
|
|
- Now, our site is publicly accessible. You can copy the link from Bucket > Static website hosting (Link)
Checkpoint
Our website should be accessbile now via Static website hosting link provided in S3 bucket.
Step 2: Route 53 Configuration
1. Configure Route 53
- Navigate to Route 53 and Under ‘DNS management’, Click Create hosted zone.
- In ‘Domain name’ field input your domain name. (You can obtain free from Freenom
- ‘Type’ will be Public hosted zone.
2. Update Domain Registrar
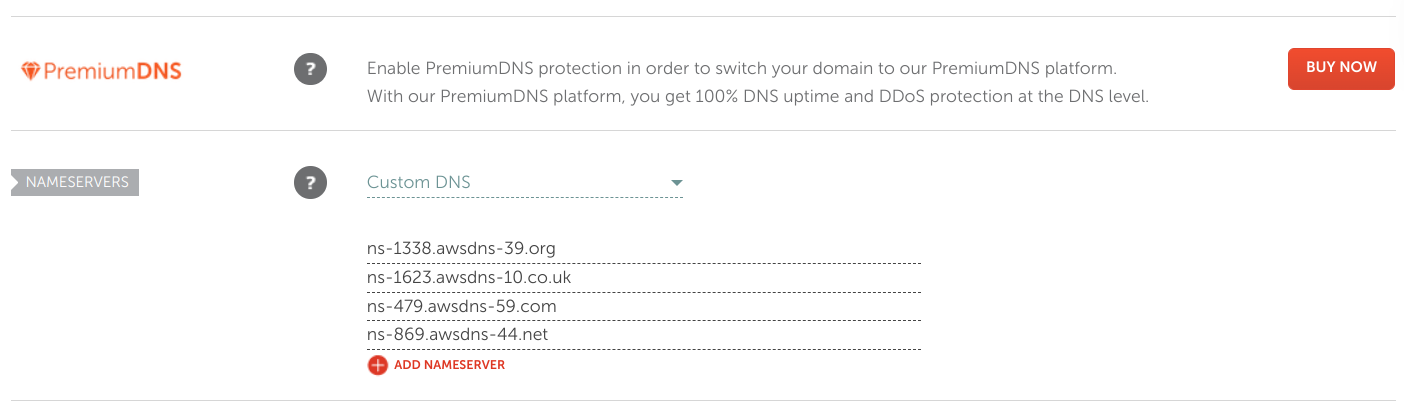
- Note the DNS nameservers provided by Route 53. Copy these Nameservers and update the records in domain registrar. (In Your domain registar find custom nameservers field & Copy the URLS without the dot at the end)
AWS: Route53 Provided Nameservers
Namecheap: Update DNS records in domain

Checkpoint
Now, Your domain is linked. if you go to your domain e.g “example.com” or “http://example.com” now its accessbile. Note: If its domain like .dev, that forces https. It wont work yet, until we configure SSL.
Having trouble? Double-check your steps with this guide, or watch our video walkthrough.
Step 3: CloudFront Setup with SSL
1. Configure SSL - AWS Certificate Manager
- In AWS Console search for Certificate Manager
- Click Request a public certificate, fill domain name example “shrawan.dev”. Choose DNS validation
- Once Submitted It will be “Pending validation”. (Action: To validate, we need to link it with our Route 53 records, Steps)
- Steps#: Certificates > Click on the certificateId
- Scroll down under “Domains”. Click “Create records in Route 53”. Click Create Records. (May take ~30 minutes)
2. Create CloudFront Distribution
- Navigate to CloudFront in the AWS Management Console.
- Create a new distribution, selecting your S3 bucket as the origin (You can go to S3 Bucket > Static Web Hosting and copy the URL manually)
- Under Viewer Protocol Policy Choose Redirect HTTP to HTTPS
- In Alternate Domain Names (CNAMEs) field, type your domain. eg “shrawan.dev”
- Under Settings, Choose Custom SSL Certificate, It will appear in dropdown once issued.
- It may take ~10-15 minutes to provision.
3. Create Route53 record - To route our domain to cloudFront distribution
- Create Route53 record. Choose Simple routing, record type A - Routes traffic to an IPv4.
- Toggle Alias to checked. And Choose “Alias to CloudFront distribution”. On Distribution choose the distribution you created just now.
Checkpoint
That’s it, If everything went correctly, you should see your website with https working. e.g “https://shrawan.dev” (Sometimes you may have to wait few minutes for the DNS records to update).
Step 4: Lambda, DynamoDB and API Gateway
1. Create Lambda Function
- Navigate to Lambda in the AWS Management Console.
- Create a new Lambda, Choose “Node.js”
|
|
- Lets Test: Go to test event, provide json. Note: The API will fail as we haven’t configured permission for Lambda, as it can’t invoke DynamoDB)
|
|
2. Setup DynamoDB Table
- Search DynamoDB in the AWS Management Console.
- Create a new table e.g “ProfileContactTable”, pass unique partition key, e.g “time”.
3. Integrate DynamoDB with Lambda - With execution role
- We need to create and configure permissions and roles
- Go to Policies > Create Permissions to access the DynamoDB.
- Copy the DynamoDB ARN from: DynamoDB > Tables > yourTable > Overview > (In General Information, expand “Additional info”)
|
|
- Create Role for our Lambda
- Go to Roles > Permissions > Add Permissions and Select the permissions you created above
- Apply this role to the lambda
- Go to your-lambda > Configuration > Permissions > Edit > Existing role (Select the above newely created role)
2. Set up API Gateway
- Navigate to API Gateway in the AWS Management Console.
- Create a REST API and create a method in it.
- Select a method such as POST, GET, PATCH
- You must toggle Lambda proxy integration
- Please, check and enable CORS in the API Gateway. (Also return the CORS header appropriately from lamda: as shown in above lambda code)
Conclusion
You should be able to Successfully deploy static website to your custom domain using AWS S3, Route53 & Cloudfront with SSL. If You followed additional Steps: You will learn to use Lambda, DynamoDB and API Gateway.